HiJack

HiJack “Hello world!” Project
HiJack is a hardware device that plugs right into your iPhone/iPad headphone jack. The current HiJack firmware supports an 8 bit A-D converter that takes an input of 0-2.75 volts. In this article, we’ll look at how to hook up the HiJack hardware and write a simple program to access data.
In the programming world, it’s been tradition to start off with a new computer language by writing a simple program that prints “Hello world!” This started with Brian Kerninghan, who wrote the first hello world program in a tutorial for the B programming language in 1972. With nearly 40 years of tradition behind us, we’ll start our exploration of the HiJack hardware with a simple program to read the data, and a simple hardware project to provide that data--hello world, hardware style. We’ll call our program Hello HiJack.
One of the challenging things about interfacing hardware to a computer is that it involves at least two distinct disciplines, electrical engineering and programming. If you are reading this article, you’re probably at least conversant with one of these fields, but very few people are expert in both. Because of that, I’ll provide a lot more background in programming than the programmers need, and more background in electronics than the electrical engineers need. I’m sure you’re good at skimming by now, so feel free to skip over the sections you already know well.
Building the Sensor
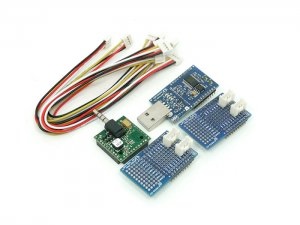
With a HiJack board in hand, the first thing we need to do is build a sensor. Ours will be about as simple as they come: We’ll use a potentiometer (variable resistor) to provide a voltage we can change by varying the resistance. You can pick up potentiometers from pretty much anyplace that sells electronics components. The specific resistance doesn’t matter, either. I used a tiny little 10K (10,000 ohm) trim pot I had laying around in a parts bin.
The idea behind this sensor is to divide the voltage supplied by the HiJack device. Resistors in series divide an input voltage. Here’s a diagram of the circuit we’ll be building. Purists will notice that I showed two separate resistors rather than a potentiometer. Electrically they are the same thing as long as the potentiometer is not being adjusted, though, and it makes the following discussion a little easier.
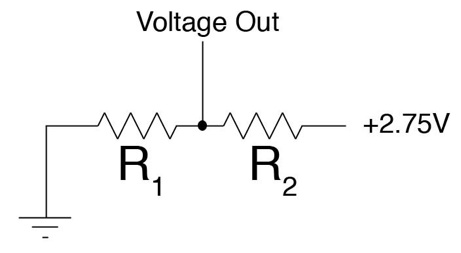
The three lines forming the triangle at the left is the ground connection, abbreviated GND on the Seeed Studio documentation. This is the negative voltage side of the circuit. The other side, marked +2.75V, is the positive power supplied by the HiJack device. This pin is marked VCC on the Seeed Studio documentation. Our circuit will connect up to these two pins to draw power across the potentiometer.
Now a potentiometer is essentially, and sometimes literally, a resistive bar that uses a slider of some sort that slides over the resistor. The bar is connected to a third wire. Sliding the bar changes the resistance to either side, dividing the resistance in two parts that always add up to the total resistance in the device. The voltage output from the ground connection to the center wire of the resistor will be

where Vin is the 2.75 volts supplied by HiJack, and R1 and R2 vary as you adjust the potentiometer. Anything that detects the voltage from the ground connection to Voltage Out will see the voltage vary from 0 to 2.75 volts as the potentiometer is turned. That’s exactly what the HiJack hardware will measure.
On the other end of the circuit sits the HiJack device itself. The top of the HiJack device has three female headers that provide 10 wiring connections each. Here’s the pinout, from a larger diagram available at the Seeed Studio site:
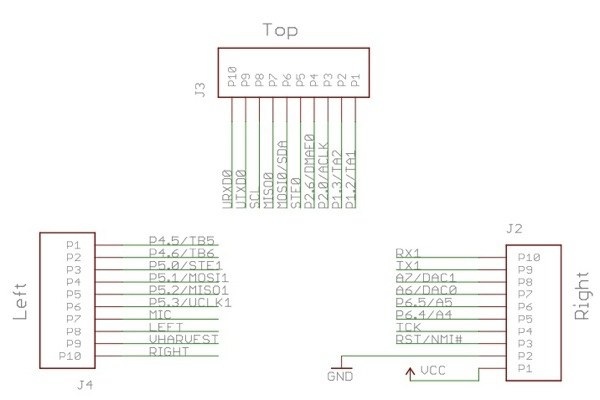
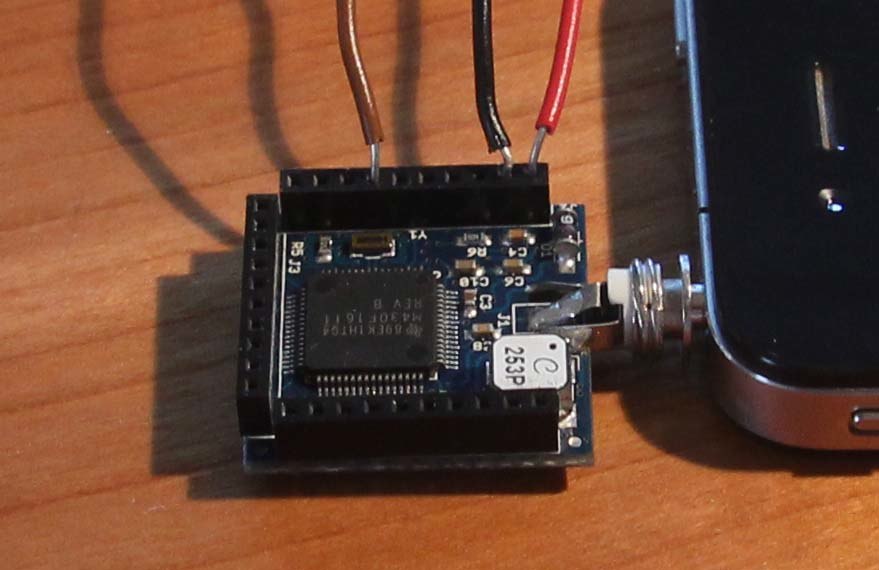
The connections we’re interested in are on the right bar. We’ve already talked about GND and VCC; those pins provide the 2.75 volt power source we are using. The data input line is A6/DAC0. That’s the pin we need to connect to the center pole on the potentiometer. Following the convention of black wires for ground and red for positive in DC circuits, and using a brown wire because I had one handy in my parts box, here’s a closeup of the connections on the HiJack device.
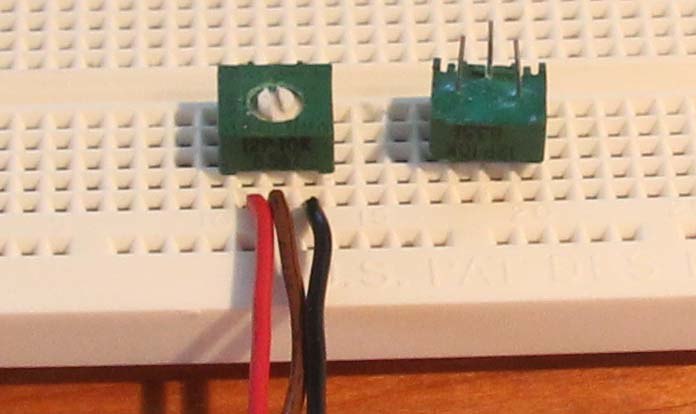
Potentiometers have three pins. In general, the center pin is the one we want to hook up to A6/DAC0, and GND and VCC can be connected to either of the two remaining pins. Here’s what it looks like in my circuit, with a second, identical potentiometer upside down beside the one I used so you can see the pins coming out of the bottom. I used a breadboard for the connections, but that’s because I had one laying around. Anything that will securely mount the wires to the potentiometer and let you easily adjust the resistance will work just fine.
The Hello HiJack Program
With all of that hooked up, it’s time to write a program to show what’s happening. Run techBASIC from your iPhone or iPad, tap the New button to create a new program, and enter Hello HiJack as the program name. Tap the Source screen to get the keyboard and enter this program. The letter case doesn’t matter, but I’ve used uppercase for BASIC keywords and for the first letter of class names to make it easier for you to read the program.
WHILE 1
System.clearConsole
PRINT HiJack.receive
System.wait(0.5)
WEND
The WHILE and WEND lines form a loop that will loop as long as the expression on the WHILE statement is non-zero. 1 will be non-zero for a really long time, so the loop will go forever. The only way to stop this program will be to press the Stop button that will show up at the top of the screen when the program starts running.
System.clearConsole clears any text from the console, where text input and output appear.
The PRINT statement then prints a two-dimensional array to the screen. It gets that array from the HiJack hardware–HiJack.receive is a function that returns an array where the first element is a value between 0 and 255, with lower numbers when the voltage is low and higher numbers when it is high, and a second value that is a time stamp. The time stamp may not seem to change much, but it’s a large number whose most significant digits change slowly.
System.wait(0.5) pauses for a moment so we get a chance to read the screen without too much flicker. The parameter tells the call how long to pause, in this case for 1/2 of a second.
After typing in the program, plug the HiJack hardware into the headphone jack on your iPhone. Tap the Programs button at the bottom of the screen, then tap the name of the program (not the round blue disclosure button to the right, the actual name) to run the program. techBASIC will change the display to the Console, where you should see a number that occasionally changes. After a second or two it will settle down to a single number, or perhaps flick back and forth between two values. Adjust the potentiometer, and you’ll see the number change. Just a few more steps, and you’ll be building Robo Cop!
When Things Go Wrong
OK, not so fast. Did it work? If not, there are two places for things to go wrong: the software or the hardware.
If there is a problem with the software, techBASIC will say so. Check to make sure the program is exactly the one typed above. Letter case is not important, but spaces and line breaks can be. Make sure there are five lines, and that there are spaces between the words where shown, and no spaces inserted. clear Console is not the same as clearConsole! Also, look at the error messages from techBASIC. They will usually pinpoint the problem, and even if they don’t, the real problem will be close by.
If the program is running and printing numbers, but the numbers seems to jump around randomly, you probably don’t have a good connection. Check to make sure the HiJack hardware is plugged all the way into the headphone port. The metal disk on the washer does not fit flush against the case, so don’t push too hard. If you are using an iPod Touch, you may also need to twist the jack around a bit.
The last source of trouble is the HiJack hardware or the circuit. Check it all carefully to make sure the right wires are connected to the right places, and that the wires are making a good electrical contact.
A Better Program

Our goal is a program that plots results like those to the right. We’ll plot 10 seconds worth of data, collecting a data point every 0.1 seconds, for a total of 100 data points plotted at any one time. The newest data will always appear at the right, at time=0, and older data will be scrolled to the left, with time getting more and more negative until the point falls off of the display.
Let’s start with the finished program and pick it apart. I’ll show the complete program first, then we’ll walk through it line by line. The program is also available for download at the end of this article, so don’t type it in unless you just want the practice.
! Shows a running plot of HiJack
! input for the last 10 seconds
! in 0.1 second intervals.
!
! Initialize the display with the
! value set to 0.
DIM value(100, 2)
FOR t = 1 TO 100
value(t, 1) = (t - 100)/10.0
NEXT
! Initialize the plot and show
! it.
DIM p as Plot, ph as PlotPoint
p = Graphics.newPlot
p.setTitle("HiJack Raw Data")
p.setXAxisLabel("Time in Seconds")
p.setYAxisLabel("Value Read")
p.showGrid(1)
p.setGridColor(0.8, 0.8, 0.8)
ph = p.newPlot(value)
ph.setColor(1, 0, 0)
ph.setPointColor(1, 0, 0)
! Set the plot range and
! domain. This must be done
! after adding the first
! PlotPoint, since that also
! sets the range and domain.
p.setView(-10, 0, 0, 255, 0)
system.showGraphics
! Loop continuously, collecting
! HiJack data and updating the
! plot.
DIM time AS double
time = System.ticks - 10.0
WHILE 1
! Wait for 0.1 seconds to
! elapse.
WHILE System.ticks < time + 10.1
WEND
time = time + 0.1
! Get and plot one data point.
h = HiJack.receive
FOR i = 1 TO 99
value(i, 2) = value(i + 1, 2)
NEXT
value(100, 2) = h(1)
ph.setPoints(value)
Graphics.repaint
WEND
OK, that’s not too long, as programs go. It’s just 55 lines, and a lot of them are comments. Let’s see what it does. Here’s the first chunk.
! Shows a running plot of HiJack
! input for the last 10 seconds
! in 0.1 second intervals.
!
! Initialize the display with the
! value set to 0.
DIM value(100, 2)
FOR t = 1 TO 100
value(t, 1) = (t - 100)/10.0
NEXT
This first chunk of code has come introductory comments, then sets up an array to hold the values we will eventually read from the HiJack hardware. techBASIC won’t care if you leave out the comments (the lines starting with a ! character), but commenting your code is a good habit. The array value will hold up to 100 values. It’s a two-dimensional array because we will need to tell techBASIC both the X and Y values for each point to plot. The X values are the timeline, which doesn’t change, so we use a FOR loop to fill in the X values. Our intent to to collect one point every 0.1 seconds, and display 10 seconds worth of data, so we fill in the X values with values ranging from -9.9 to 0. We can safely leave the Y values unchanged, since BASIC initialized new variables to 0, and that will work fine for our purpose.
! Initialize the plot and show
! it.
DIM p as Plot, ph as PlotPoint
Next we need to create a plot. The DIM statement sets up two variables, one to hold the Plot class that displays the plot itself, and another for the PlotPoint class, which contains the actual points to plot. Why didn’t techBASIC do this in one step? Well, the Magnetometer sample that comes with techBASIC is a good example that shows why not. It plots three lines on a single display, one each for the X, Y and Z directions. That sample still just has one Plot class, since we want all of the lines to show up on a single plot, but there are three PlotPoint classes, one for each axis. You can add as many lines as you like to a techBASIC plot.
p = Graphics.newPlot
p.setTitle("HiJack Raw Data")
p.setXAxisLabel("Time in Seconds")
p.setYAxisLabel("Value Read")
p.showGrid(1)
p.setGridColor(0.8, 0.8, 0.8)
The first line creates the plot itself. Think of this as the background, including the titles, axis, and so forth. The setTitle method sets the title at the top of the plot, while the next two lines set the axis labels. showGrid turns one the grid lines that appear behind the plot line; without this call, the background is blank. Finally, we set the grid color to a light gray. Like almost all techBASIC calls that take a color, setGridColor takes three parameters, one each for the intensity of the red, green and blue colors, in that order. The valid values are 0.0 to 1.0, with 0.0 being black, and 1.0 being the full intensity for that color. A few calls have a fourth number for the alpha channel, which tells how transparent a color is. That lets you draw something over a background and, to the degree specified by the alpha value, see through the new color to whatever lies behind it. Check out this Wikipedia article if you would like to know more about how RGB color works on a computer.
ph = p.newPlot(value)
ph.setColor(1, 0, 0)
ph.setPointColor(1, 0, 0)
The next step is to set up the PlotPoint class that actually draws the line across the plot. The newPlot method creates a new instance of the class and adds it to the Plot we just created. We then set the color for both the line and the points where the data is actually plotted to red. There are other calls in the PlotPoint class that control the shape of the points and line; you can use those to customize your version of the program.
! Set the plot range and
! domain. This must be done
! after adding the first
! PlotPoint, since that also
! sets the range and domain.
p.setView(-10, 0, 0, 255, 0)
HiJack always returns a value from 0 to 255, and we know the X axis will show times from -10 to 0 seconds, so we set the axis to show exactly those values. Without this call, techBASIC will default to showing 0 to 10 along the X axis and roughly -5 to 5 along the Y axis. We can always change what we are looking at with some swipe and pinch gestures, but this saves us the trouble.
system.showGraphics
Now that things are set up, we tell techBASIC to switch to the Graphics display. Again, we could have done this with a tap on the Graphics button, but this saves us the trouble.
! Loop continuously, collecting
! HiJack data and updating the
! plot.
DIM time AS double
time = System.ticks - 10.0
HiJack can report data at various rates up to a little more than 100 points per second. The default rate in techBASIC is about 40 values per second, which is more than we need. These lines set up a time stamp we will use to tell when 0.1 seconds has elapsed. Each time that happens, we’ll grab a new point from the HiJack hardware and add it to our plot.
WHILE 1
Just like the first program, this program will loop until you manually stop it with the Stop button.
! Wait for 0.1 seconds to
! elapse.
WHILE System.ticks < time + 10.1
WEND
time = time + 0.1
Here is where we wait for 0.1 seconds to elapse. The WHILE loop waits until the system clock reports a time 10.1 seconds past the original time we recorded before the loop started. We then add 0.1 to this time so the next time through, this timer loop will wait until 10.2 seconds have gone by, and so forth.
! Get and plot one data point.
h = HiJack.receive
This is all it takes to actually read the HiJack hardware. A value from 0 to 255 is stuffed into the variable h.
FOR i = 1 TO 99
value(i, 2) = value(i + 1, 2)
NEXT
This loop shifts the 99 most recent points in the value array one index lower, which will cause them to be drawn one point to the left on the plot. Remember, the time is preset, and is not being shifted, so this essentially makes each point 0.1 seconds older on the plot. The first time through, this is just copying a bunch of zeros, but after 10 seconds, all of the values are older values read from the HiJack hardware.
value(100, 2) = h(1)
The new point goes in the last spot in the plot. We pull off the first element of the array, which is the HiJack data, and ignore the second, which contains a time stamp we don’t need in this program.
ph.setPoints(value)
Graphics.repaint
This tells the PlotPoint object we create and stored in ph to use a new set of points. Next we repaint the graphics screen, showing the new information on the plot.
WEND
Finally, we go back to the WHILE statement and do it all again.
Try out the finished program with HiJack. You should be able to see exactly where the potentiometer is set, and watch the change as you adjust it. This program will work with all of your HiJack projects, although you will probably develop custom programs for specific sensors and uses. Be sure and drop me a line. I’d love to hear about the things you build with HiJack and techBASIC!
For More Information
Find out more about the HiJack project at the University of Michigan’s HiJack page and at the wiki on the Seeed Studio site. The wiki also has information about other hardware projects you can build, downloads for the software to update the firmware on the HiJack, and the latest version of the firmware.
You can buy the HiJack hardware from Seeed Studio. Here’s a direct link to the development bundle I used.
You can find out more about techBASIC on the techBASIC web page. This page also has downloads for the techBASIC reference manual.
techBASIC is available from the app store.
And finally, here is the program presented in this article. You can download it to your computer and move it to techBASIC using iTunes. The Quick Start guides will step you through the process of moving files between your computer and your iPhone. The Quick Start guides are available at the bottom of the techBASIC page.
Copyright 2011, Byte Works, Inc. All Rights Reserved.
Wednesday, December 7, 2011

